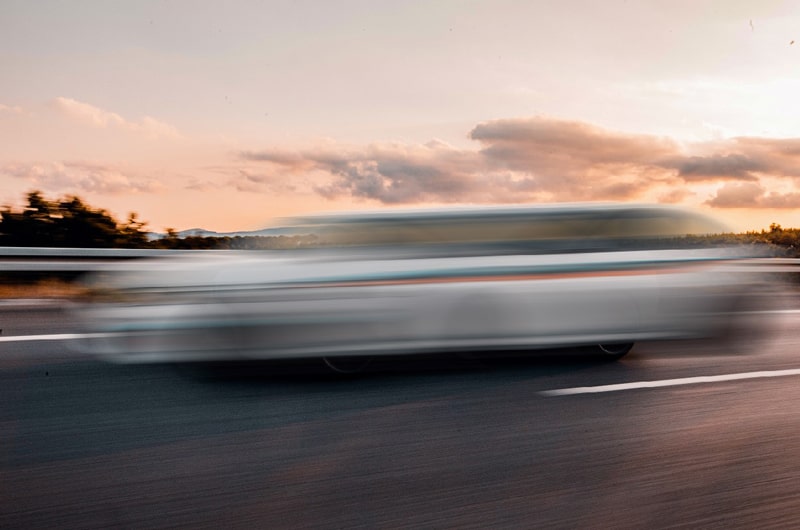
Car Motion Blur Effect in Photoshop is a blessing when you want to make your car photo realistic. Well, it is a fantastic technique to bring life into static images. It’s a trick to hold the target audience’s eyes.
Here in this article how to create moving car motion blur effects in Photoshop CC? I will share a step-by-step guide on creating perfect moving car motion blur effects in Photoshop.
These simple effects bring speed & a dynamic vibe into a static shot. Surprisingly, these little effects can bring massive changes. Guess what, it will increase your automotive sales or turn your sports automotive photos stand out on the web. Let’s learn this simple effect & make blast automotive shots.
Why Moving Car Motion Blur Effects in Photoshop isEssential?
Well, you must notice sports photography & automotive business becoming so popular throughout the globe. It is challenging to bring high speed in a static shot in sports photography.
Are you wondering how the professional photographer represents the live speed in a static image? Yes, Motion blur effects are the secret behind those masterpiece shots. It helps you to make your automotive photos extraordinary.
Simultaneously, it is essential to create your own identity. If you find this method complicated or busy with a hectic work schedule, then tale professional automotive editors help. A little investment can help to make a double the return. Besides, it helps to sustain in the market competition.
The automotive market is becoming too competitive with huge market demand. It is key to reach target audiences & make them tempted to buy your car.
When you are capable of representing the speed in your shots, it will attract potential clients. So sports photographers, product photographers, or e-commerce businesses must need to learn these useful effects. Let’s grow your business with this simple technique.
Overview to Create Moving Car Motion Blur Effects in Photoshop CC
There are so many techniques used to create motion blur effects. After doing an intense analysis, I will share the best two effective moving car motion blur effects methods. The best part is you will get the most straightforward technique here. But it will provide the best output.
Let’s start with the first technique.
Method 1: How to Create Moving Car Motion Blur Effects in Photoshop CC
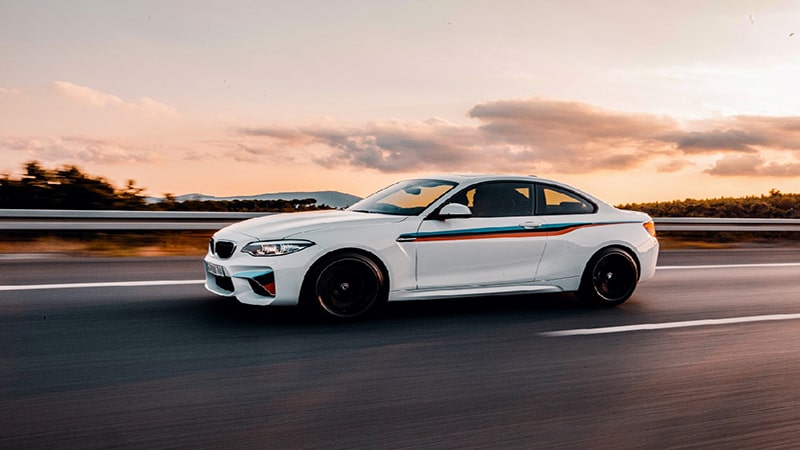
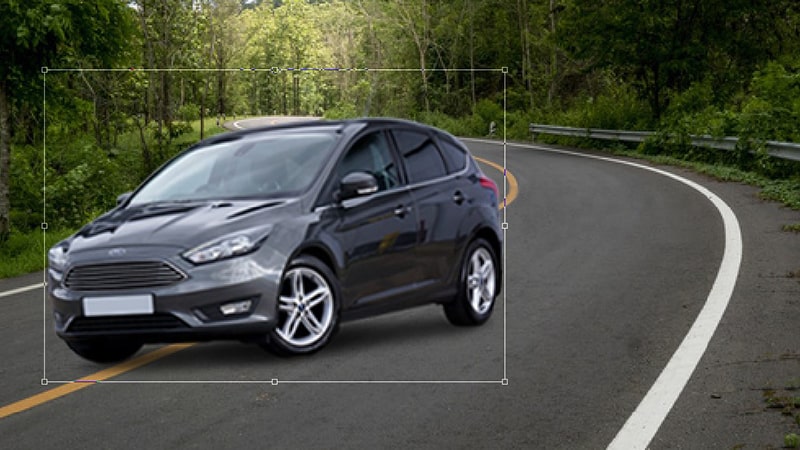
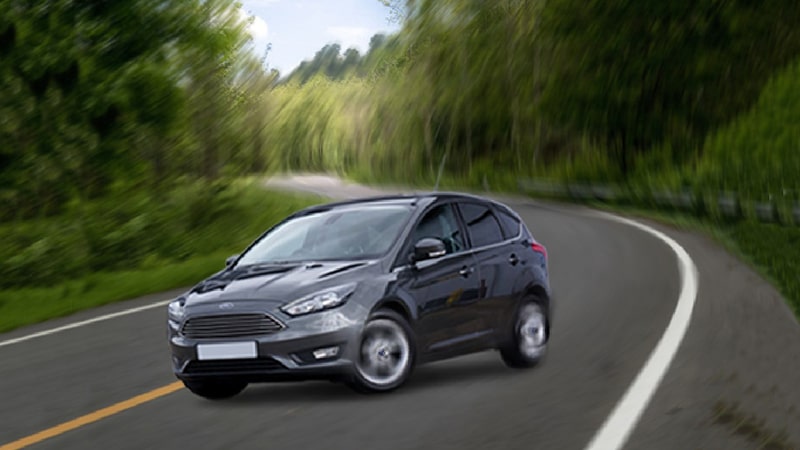
To implement this method, we are choosing the below images. Open your Photoshop now choose file-> Open the image.
Step 1- Object Selection for Car Motion Blur Photoshop
Motion blur effects are here to enhance your original car image beauty. But it is not acceptable to harm/reduce image quality instead of improving.
So the first step is to make your original image secure. You need to apply effects on a duplicate layer to avoid any unwanted mistakes. In the motion blur technique, you may skip it as we are significantly changing a specific area.
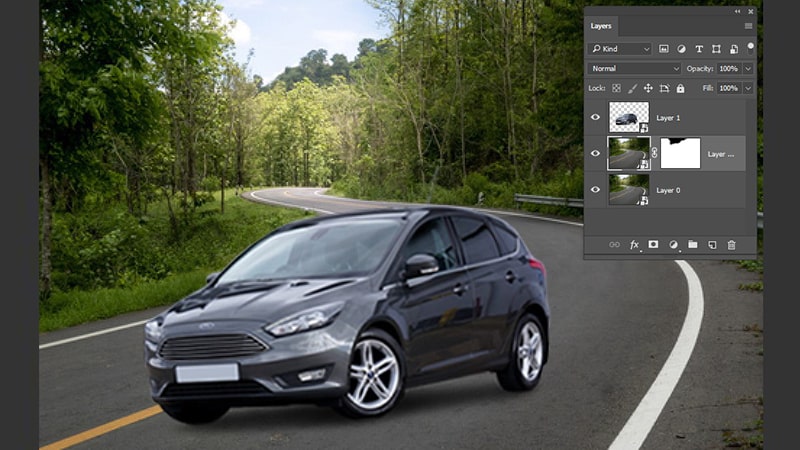
We are aiming to create moving car motion blur effects. Here, our subject is the moving car & we need to cut out the issue from the environment. Now, I am going to make a selection around the moving vehicle from the images
From the toolbar, choose any selection tool, including Lasso, Pen tool, etc. Now right click on the car & create a selection around the vehicle. If you select the pen tool, you need to draw the path accurately. Zoom in on the photo.
Then right-click on the mouse & make multiple anchor points according to the car’s edges. After covering the whole vehicle, you need to end the path by clicking on the initial point.
The pen tool provides depth control to create a perfect selection. But it needs dedication & experienced hands because a wrong click may lose valuable pixels. The more accurate you can make the selection, the more fantastic blur effects you can derive. So, I will suggest using the Pen tool.

Step 2- Copy The Path
Now you are done with path selection. In this step, you need to copy the selection area to a new layer. It is effortless.
From the top Option, Bar chooses On Layer- New- Layer Via Copy.
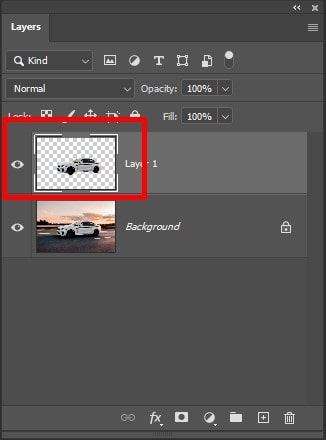
Now your selection area is successfully copied into the new layer.
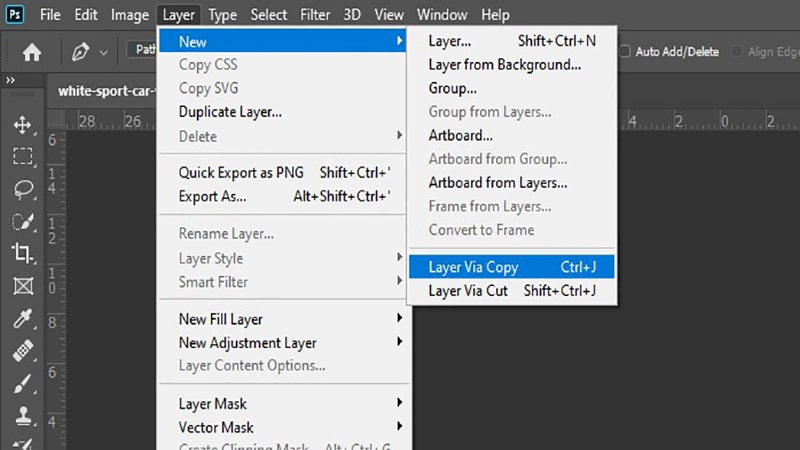
Well, if you want to do it faster, then enter Ctrl+J. It will also copy the selection. Now check the layer panel from the right side of photoshop. You will find a new ‘layer 1’ with the selected area only. The best thing about this layer is the background is transparent. It only contains your selection portion to make your blur task efficient.
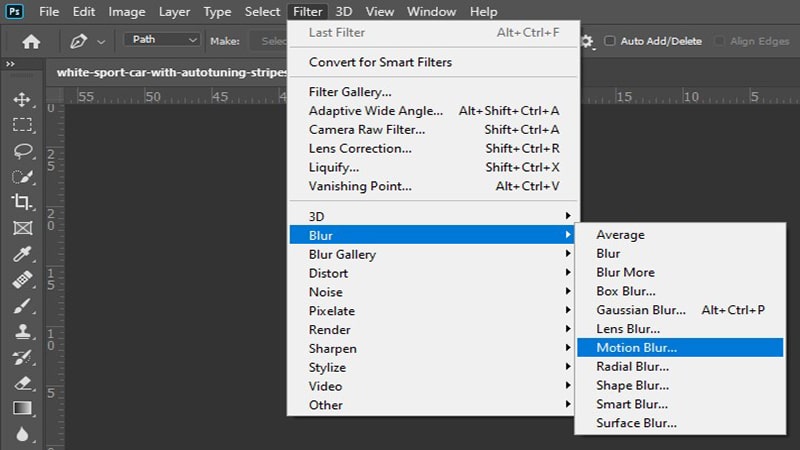
Step 3- Create Motion Blur Effects
Now, we are done with the subject cut out from the background. So, the image is ready for creating motion blur effects. Follow the below steps
From the option bar, choose Filter- Blur-Motion Blur.
You will get a new pop-up of motion Blur effects. First, fix the angle of the motion blur from the dialog box. You need to fix the angle in a way that can bring matching direction with your car’s movement.
The car direction works horizontally or left to right or vice-versa. So you can try 0° & then increase it to see the preview & appliance. In my shots, the cars need to move slightly uphill. So, I set the angle 2° & see it brings a perfect matching direction.
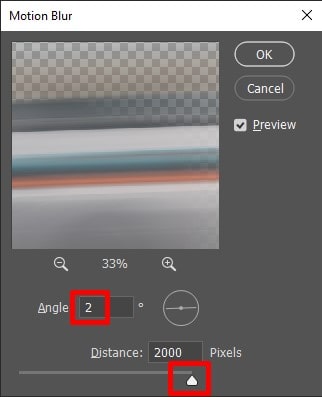
Moreover, in the dialog box, you will find an angle control wheel. You can move it up or down to bring the perfect direction. You need to click on the preview, then drag the wheel & see changes on the preview window.
It is a too simple way to set the appropriate angle. It is your choice to enter the value manually or adjust the control wheel to fix the angle. Both methods are easy. You need to find the right angles based on your subject’s needs.
Now it’s time to adjust the distance slider. Drag the slider right or left to set the length of the motion blur effects. It would help if you tried all possible ways to find out the best view. It is better to bring the longest blur streaks to get the best blur effects.
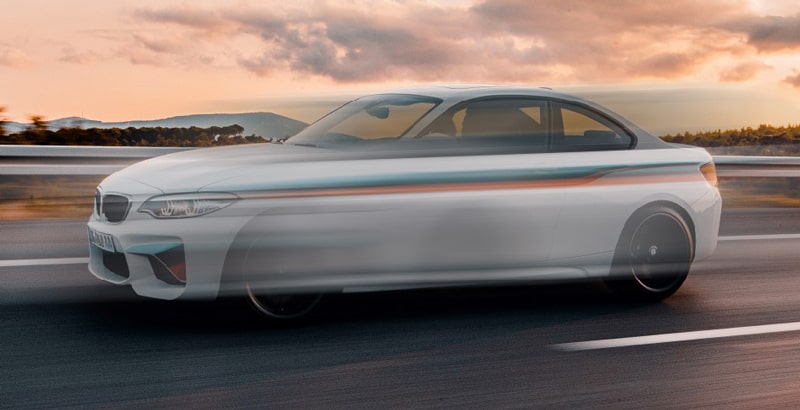
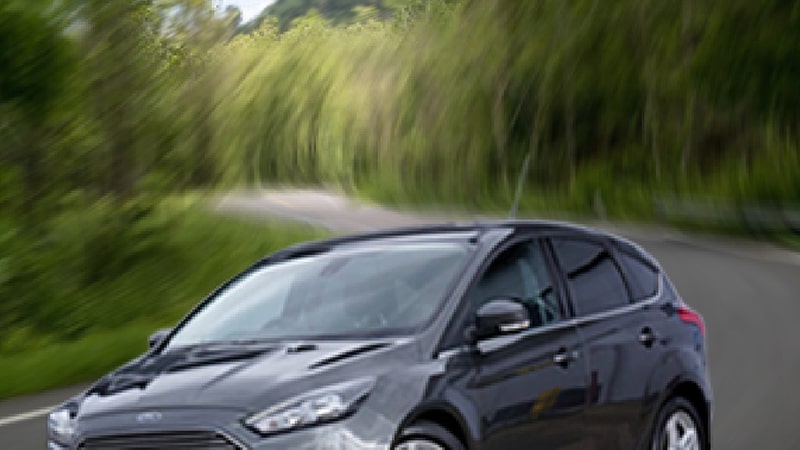
At this step, give some dedication & effort to check the changes with the slider dragging carefully. Don’t miss a perfect preview due to an eye glimpse. Now Select OK to come out from this Motion Blur window. After doing the above steps, the images look like the below images.
Step 4- Copy Motion Blur Layer
It is time to create the Motion blur effects. You can notice that the previous motion streaks look too feeble. It needs to improve density to make the effects perfect. Do you want to know how? It’s effortless.
You need to copy the motion blur layer that is your layer 1. Guess what? Duplicating the layer will enlarge the blur streaks & make it denser. As a result, you will derive visible & vivid blur effects. Well, copying layer copy the blur streaks so it makes it stronger.
I guess a 4-5 copy of the layer is enough to create a perfect blur effect. Yet it depends on your image angle & requirements. You can try more or less.
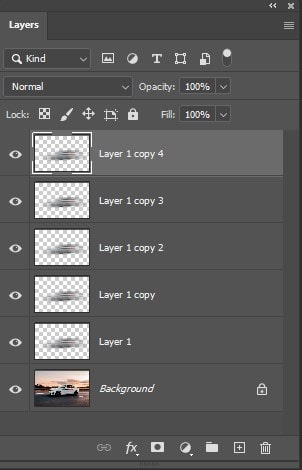
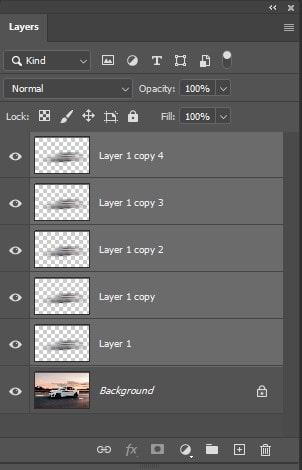
Just enter Ctrl+ J to make a quick copy of the layer. After making a copy layer check the blur streak intensity in the images. It helps to decide whether you need to copy more or you are done with perfect effects. I make four copies of layer 1 for my pictures. Check the below images you can see the copy layer from the layer panel.
Finally, the copy layer improves my blur streak intensity. Check the after-effects images & feel the improvement. Isn’t it amazing?
Step 5: Select all Blur Layers
Now it’s time to merge all the copy blur layers into an individual layer. It makes your blurring task easier.
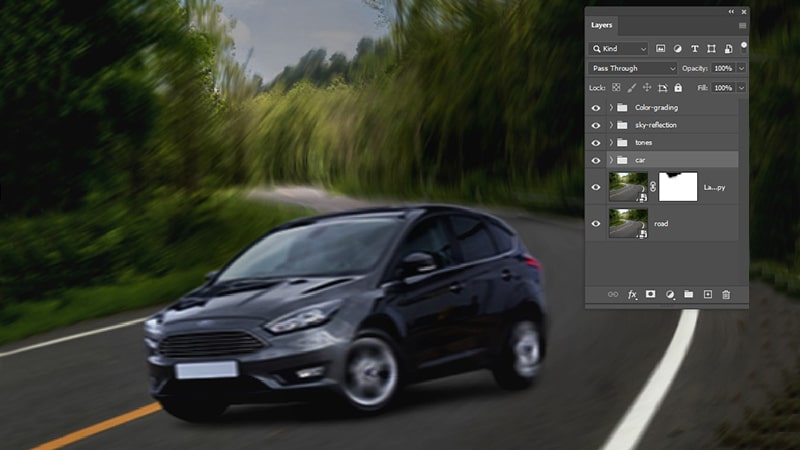
Now hold Shift & click on all the copy layer 1, including the main layer 1. It will select all the copy layer 1, including the original layer one together. Check the below images. It will make the layered blue in the layer panel.
Step 6: Merging
You are done selecting all the layers. Now it is time to merge the layers into a new layer.
From the Options Bar, click on Layer- Merge layers.
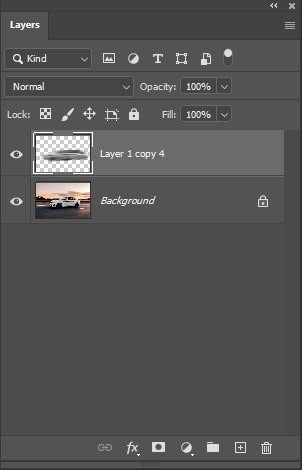
Now in the layer panel, you can find only two layers with our existing layer effects.
Step 7- Masking
Now the blurry effects have only problems because the blurry effects are not positioned correctly. You don’t want to create blurry effects over the whole area. It needs to be made in any particular portion. To solve this problem, you need to hide the blur streaks you don’t want blur effects.
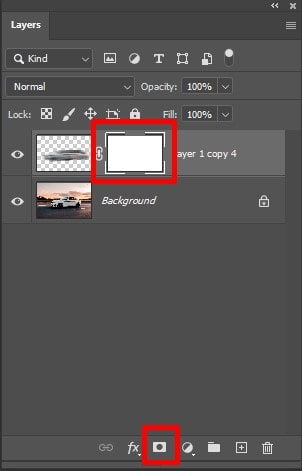
It is a layer mask that can hide blur streaks & give you the perfect effects. An ideal car blur appears behind the car & the blur blends with the vehicle.
To hide unnecessary blur streams, select the motion blur layer & then select the layer mask from the right-bottom of photoshop. It will make a layer mask thumbnail to the right of your original layer.
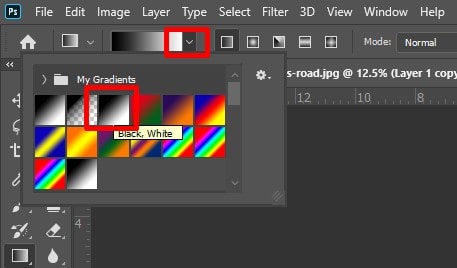
Step 8- Choose Gradient
Now from the toolbar, choose the Gradient Tool, or to apply the shortcut, enter G.

Step 9- Apply Gradient to create Car Motion Blur Photoshop
After choosing gradient tools, check the top options bar & change the screens to apply it accurately. You will find a down arrow beside the screen. Click on the arrow. Then you will find the multiple gradients option. You need to select the black to white gradient.
Step 10- Apply Gradient on Layer Mask
Check your layer panel. If your layer mask is a highlight with a white border, that means you are selecting the layer mask. If you don’t find the border on the mask thumbnail, then take your mouse on it to fix it.
Now, it’s time to say goodbye to the unwanted blur streaks & create an appealing illusion. Here your target is to focus on the car emerging from the blurry effects. It would help if you found where you want to remove the blur streaks & click on that area.
After that, drag out the little transition area. As a result, it will fade the blur streaks. Keep in mind that when you release the mouse pointer in that area, the blur streaks will be 100% visible.
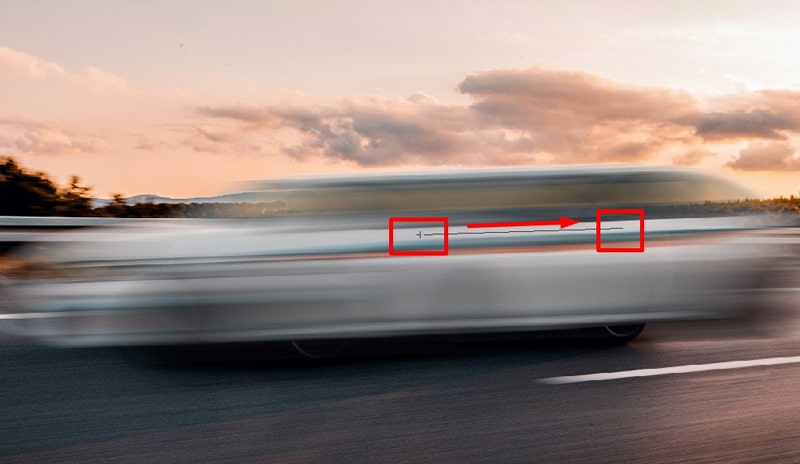
In our image, I want to begin with the car’s driver & drag it backward of the car to make a short transition. I release my mouse behind the driver. So the blur streaks faded behind the driver. Also, it is essential to maintain a similar angle both for blur streaks & gradient drag out.
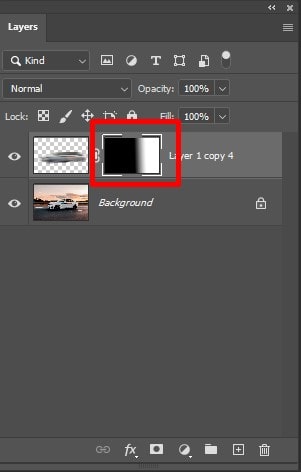
After releasing the mouse, check the layer panel in photoshop.
You will find the gradient in the layer mask thumbnail. The black portion is indicated blur streaks are hidden in this area & white suggests that the blur streaks are visible in this area. The best part is the middle portion of this gradient, where blur streaks blend or fade to create an illusion.
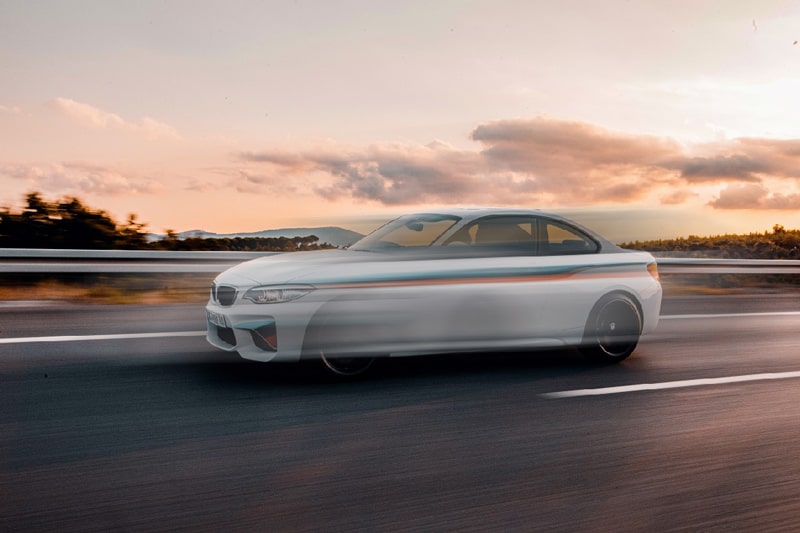
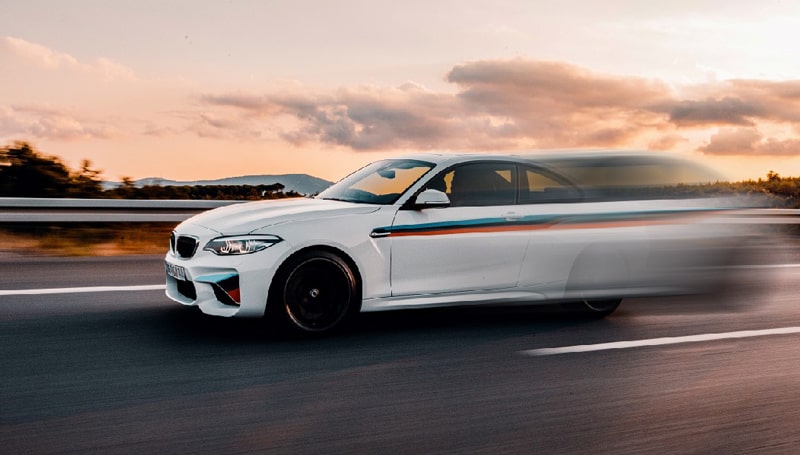
Now, Our moving car motion blur effects are entirely done. Check the below image. After applying a gradient on the layer mask, it makes a moving motion blur behind the car. See, it makes a high-speed car’s photo that can grab the audience’s attention.
Read More:
How to Composite Car Images into a New Background
How to Edit Car Photos in Photoshop: Car Image Retouching Process
Method 2: Create Car Motion Blur Effects in Photoshop
In this method, we are taking two different files. One is for the subject that contains the car with transparent background & the other one is the background file. We are compositing the vehicle into the background & making it move by creating motion blur effects.
These two different layer makes the technique more convenient. Let’s start with the method.
Step 1- Resize the Car
Car resizing is important to create perfect motion blur effects. It helps to create an infusing view into a high-speed static car picture.
Actually, it is a one-click task. Enter Cmd/Ctrl+T, then resize your car according to your needs.
Step 2- Background Extending
To create an eye-catchy motion blur illusion, it is essential. I am extending the car’s photo side to side. Select Image- Canvas Size & then increase 1000 px to the right of the image & then enter Ctrl+ T to extend the original image & fit it on the extended area.

Step 3- Background Blur Phase 1
To create blur effects on the background, you need to convert the background to a smart object. From the Layer Panel, choose the background & right-click on it, then select Smart Object. Now make a duplicate layer by entering Ctrl+J. It would help if you created a layer mask on the duplicate layer.
From the layer panel, select the duplicate layer, then choose Layer- Layer Mask- Reveal All. Now from the toolbar, pick the Brush tool or enter “B” & then start dragging over the sky area. Make sure you are selecting the foreground color as black.
While you cover the sky with a black brush, it protects the sky from blur effects while working on the background. The portions you don’t want to attach motion blur need to paint with black color.
Step 4- Background Blur Phase 2
Now it’s time to create blur effects in the background. Select Filter- Blur Gallery- Path Blur & drag with your mouse to make some paths. It would help if you drew the path where you want to attach the motion blur.
Our target is to make a backswing” blur illusion that covers the whole car to show high speed. In this method, I follow the line of the road to create my blur streaks direction. And see, that makes the car live.
Here we aim to represent speeds, so check the blur settings. The gallery adjusts blur settings to bring accurate blur effects to describe the car’s motion from the filter. Play with the different filter settings & slider until it looks perfect with your vehicle.
Step 5- Background Blur Phase 3
Now finish the path blur effects & then pick the brush tool to paint with black in the mask. As a result, the sky remains the same. No blur effects harm the sky. It is important to paint over the sky from a bit of an over-blown area. That makes blur effects perfectly merged & blended. It helps to make the effects realistic.
Step 6- Wheels Blur
Now select the car layer. Then choose Filter- Blur Gallery- Spin Blur. Now right click on a wheel to create a blur effect. You can select any wheels according to your wish. Pick the anchor handles & start moving spin blur over the particular wheels.
You can adjust the wheel speed by balancing the angle of the blur from the slider. From the blur filter panel, move the slider to get the best rate. Repeat the same process for other wheels if you want to drop blur effects. If you’re going to erase any effects, paint it with the brush tool.
Step 7-Finishing Car Motion Blur Photoshop
Now you are almost done with the blur effects. I guess adding some blur effects on the glass of the car will make the shots outstanding. In these pictures, the clouds are going through the glass. We add blurry cloud effects to the window to enhance the beauty of the car.
Select Filter- Blur- Motion Blur. Now you will get a new dialog box. Drag the blur control wheel & angle to derive a perfect blurry cloud view through the glass. Then click, OK. You can also drag the slider left or right to make the distance value accurate. It is essential to create a realistic blur effect. Check the preview carefully & choose the precise distance for perfect output.
Conclusion on Car Motion Blur Photoshop:
In sports or automotive photographs, the most challenging phase is to display the significant speed of the car.
It is essential to make proper composition & appeal of the shots. We are bringing an easy solution for this challenging task. You can try the above two methods to derive significant moving car motion blur effects in Photoshop CC.
This article covers step by step to make the motion blur effects realistic & eye-catchy. It will help to enhance the beauty of your automotive shots. If you are a newbie photographer, try this trick. It will help to create your own identity.
You may also read:
Cars Photo Editor for Automotive Dealer Marketing
How to Edit Car Photos Like a Pro Using Lightroom
20 Car Dealership Promotion Ideas and Marketing Strategies 2020